
How Can We Help?
How to Linear Workflow: 3dsmax & VRay
Setting up 3dsmax for correct colorspace
- Enable gamma / LUT Correction : On
- Gamma : 2.2
- Material and Colors : Both On
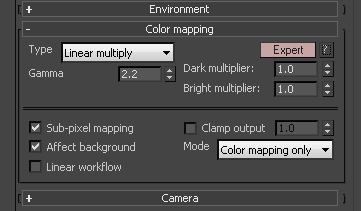
- Linear Multiply
- Gamma : 2.2
- Dark/Bright Multiplier: 1.0
- Sub-Pixel Mapping: OFF
- Affect Background: ON
- Linear Workflow: OFF
- Clamp output : OFF
Linear multiply – Simply multiplies the final image colors based on their brightness without applying any changes. The default selection.
Burn value – If this value is 1.0, the result is the same as setting Type to Linear multiply.
None (don’t apply anything) – This can be useful, for example, if you know that you will apply some color correction to the image later on, but wish to keep the rendering itself in linear space for compositing purposes.
sRGB Color Space

Button On or Off? Pre V-Ray’s manual:
Enable this button. Displays the image in sRGB color space. Click and hold the left mouse button to switch between sRGB color space and ICC.
But WHAT does it DO?
- ON : When on it show you the linear render (computer sees) in sRGB color space (what you see), basically standard monitor LUT (sRGB)
- OFF : When off (not highlighted) it is showing you what a linear color (computer sees) looks like in monitor color space (sRGB).
Save to EXR’s w/ Multipass embeded
- Save your renders through the V-Ray Tab as a raw render
- Save as Type : OpenEXR image files (*.exr)
- EXR/VRST/VRSM 32-bit output : Off
- Deep EXR: Off
- Dot Delimited frame numbers: On
exr multipart – When enabled, V-Ray will save the multichannel OpenEXR files in a format that is read much faster. Note that this option is only compatible with OpenEXR 2 and above.

Over Bright’s & Blown outs
“WHY IS IT OVER BRIGHT!!!!”. Don’t worry this is normal.
Adjust the Highlight Burn
- Turn on your “Show correction Control” in the VRay window.
- Turn on your “Exposure” Control
- The Highlight Burn work a lot like the “Burn Value” when using Reinhard.
- This is where you’ll get the render close
- Other software might call this Soft Shoulder or Soft Clip
“WHY IS IT OVER BRIGHT!!!!”. Don’t worry this is normal.
Adjust your camera exposure

LUT / Cube Workflow

- Optional to a compositing package : Export out a LUT ( Basically saves the correction you did in the V-Ray window ) fileClick on Globals…
- Click on Save
- Make sure to set the save file to .cube as most programs don’t support the .vccglb format