[siteorigin_widget class=”SiteOrigin_Widget_Image_Widget”][/siteorigin_widget]

MOTOOLS

MOTools for 3dsmax – A collection of tools. Feel free to copy, edit and change.

  • Script files with other authors will be in the header of the file. Please be curious and extend the authors info.
[siteorigin_widget class=”SiteOrigin_Widget_Image_Widget”][/siteorigin_widget]
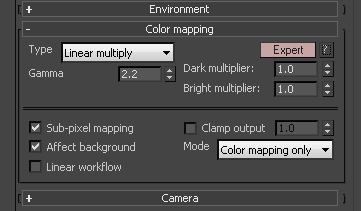
Setting up 3dsmax for correct colorspace

  • Enable gamma / LUT Correction : On
  • Gamma : 2.2
  • Material and Colors : Both On
  • Linear Multiply
  • Gamma : 2.2
  • Dark/Bright Multiplier: 1.0
  • Sub-Pixel Mapping: OFF
  • Affect Background: ON
  • Linear Workflow: OFF
  • Clamp output : OFF

Linear multiply – Simply multiplies the final image colors based on their brightness without applying any changes. The default selection.

Burn value – If this value is 1.0, the result is the same as setting Type to Linear multiply.

None (don’t apply anything) – This can be useful, for example, if you know that you will apply some color correction to the image later on, but wish to keep the rendering itself in linear space for compositing purposes.

sRGB Color Space

Button On or Off?  Pre V-Ray’s manual:

Enable this button. Displays the image in sRGB color space. Click and hold the left mouse button to switch between sRGB color space and ICC.

LINK : Chaos group – sRGB color space

But WHAT does it DO?

  • ON : When on it show you the linear render (computer sees) in sRGB color space (what you see), basically  standard monitor LUT (sRGB)
  • OFF : When off (not highlighted) it is showing you what a linear color (computer sees) looks like in monitor color space (sRGB).

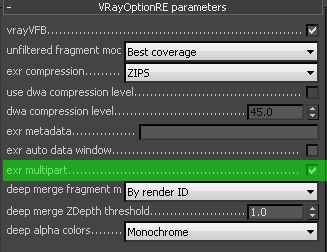
Save to EXR’s w/ Multipass embeded

  • Save your renders through the V-Ray Tab as a raw render
  • Save as Type : OpenEXR image files (*.exr)
  • EXR/VRST/VRSM 32-bit output : Off
  • Deep EXR: Off
  • Dot Delimited frame numbers: On

exr multipart – When enabled, V-Ray will save the multichannel OpenEXR files in a format that is read much faster. Note that this option is only compatible with OpenEXR 2 and above.

Over Bright’s & Blown outs

“WHY IS IT OVER BRIGHT!!!!”. Don’t worry this is normal.

Adjust the Highlight Burn

  1. Turn on your “Show correction Control” in the VRay  window.
  2. Turn on your “Exposure” Control
  3. The Highlight Burn work a lot like the “Burn Value” when using Reinhard.
    1. This is where you’ll get the render close
  4. Other software might call this Soft Shoulder or Soft Clip

“WHY IS IT OVER BRIGHT!!!!”. Don’t worry this is normal.

Adjust your camera exposure

LUT / Cube Workflow

  • Optional to a compositing package : Export out a LUT ( Basically saves the correction you did in the V-Ray window ) fileClick on Globals…
  • Click on Save
  • Make sure to set the save file to .cube as most programs don’t support the .vccglb format

Anyone ever figured a way to fix this? The FumeFX image will get blocky and more blocky the farther you get away from 0,0,0

UPDATE:

* The System Scale parameter is only accessible through MaxScript. Here’s a quote from Kresimir Tkalcec from the Afterworks forums:

“Some params that are visible from MXS and not documented are not officially supported, and/or they’re used internally.”

To set the parameter say to a value of 0.5, simple select your FumeFX Grid Object and enter this to the Listener:

$.systemScale = 0.5

 http://limjeff.wordpress.com/2011/03/06/fumefx-crawling-smoke/

So I was able to solve my issue using this method and by increasing the Step Size %

post_scripts

If you’ve ever experienced a major slow down in your max files ???

Take a look at this along with a solution.

[sourcecode language=”plain”]
t=trackviewnodes;
n=t[#Retimer_Manager];
deleteTrackViewController t n.controller;
gc()
[/sourcecode]

If you have hundreds or even thousands of Retimers in your scene file that becomes unmanageable, this post shows a couple of approaches for cleaning them out using MAXScript.

http://area.autodesk.com/blogs/maxstation/n170-filebloat-removing-lots-of-empty-retimers

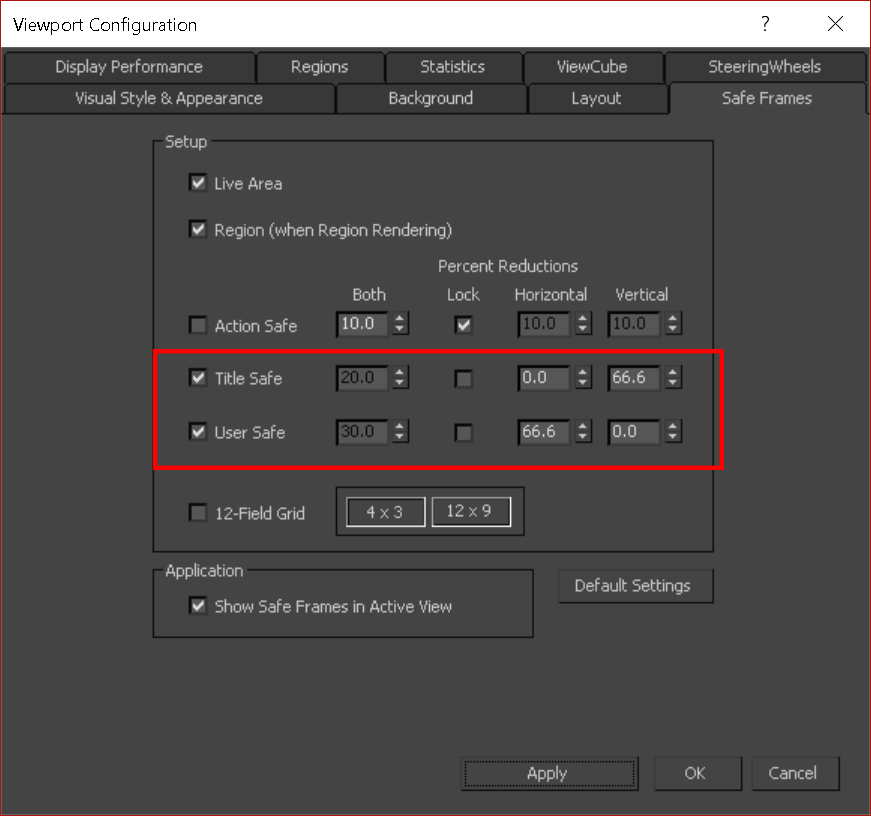
The rule of thirds

The rule of thirds is a “rule of thumb” or guideline which applies to the process of composing visual images such as designsfilmspaintings, and photographs.[1] The guideline proposes that an image should be imagined as divided into nine equal parts by two equally spaced horizontal lines and two equally spaced vertical lines, and that important compositional elements should be placed along these lines or their intersections.[2]Proponents of the technique claim that aligning a subject with these points creates more tension, energy and interest in the composition than simply centering the subject.

Here is how to display this in 3dsmax : Default max comes with only 4:3 and 12:9

ERROR : Max is super slow?

  • SOLUTION 1 : You could be running into “Auto Applied Retainers” which will automatically assign retimers to everything.  Try this :

t=trackviewnodes;
n=t[#Retimer_Manager];
deleteTrackViewController t n.controller;
gc()